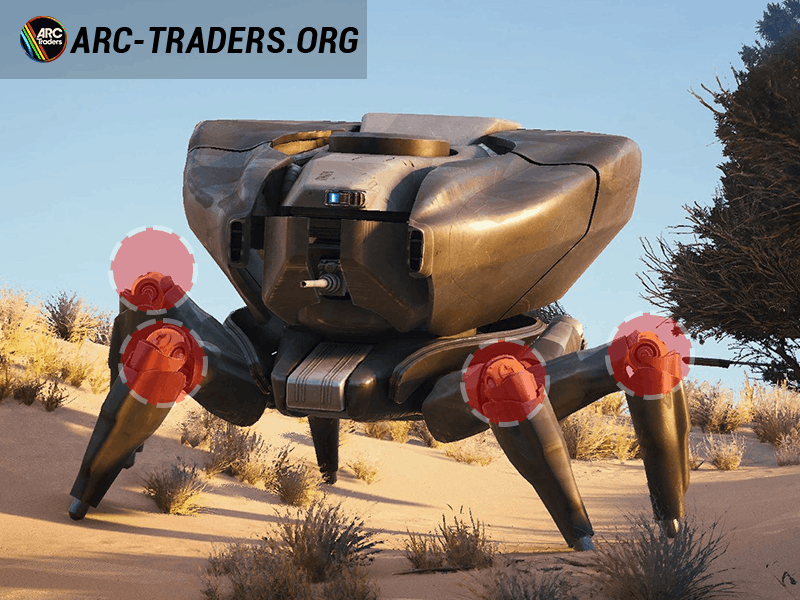
Snitch Weak Points
The Snitch weak points are located at its thrusters, meaning the thrusters. According to the wiki, the Snitch is a small, unarmed reconnaissance ARC that scans Raiders, alerts nearby ARC, and can also call in reinforcements from orbit. That is exactly why its weak point is so important: with the Snitch, it is not about shooting just any random part of the body, but about quickly preventing it from successfully sending out its alarm. According to the wiki, the Snitch can be destabilized particularly easily when its thrusters are destroyed. That is the clearly documented weak spot.
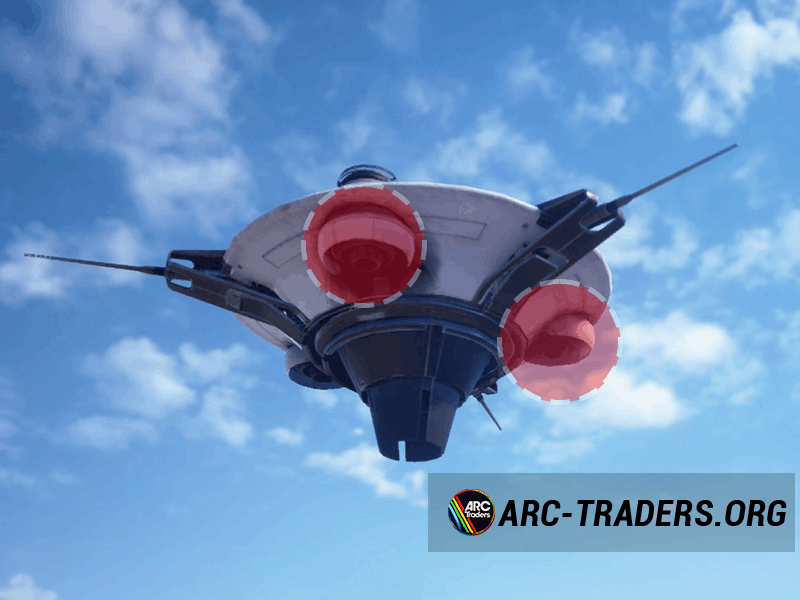
In direct combat, you should not treat the Snitch like a normal drone enemy and simply fire at the center of its body. That may work eventually, but it is often slower and less efficient. The cleanest method is to immediately focus on the side or rear thrusters. It is explicitly described as being easily destabilized once these parts are destroyed. That is exactly what makes the Snitch weak points so important: the key is not raw area damage, but fast, precise hits on its flight systems. As soon as the thrusters are damaged, the Snitch loses control much faster and with it its entire tactical value.
This knowledge is especially helpful in chaotic situations with several ARC at once. In moments like these, many players instinctively fire at larger threats first. With the Snitch, that is often a mistake, because it escalates fights. Anyone who knows the Snitch weak point therefore prioritizes it early, consistently uses the game’s learned weak-spot logic, and often prevents additional enemy waves as a result. The best approach is clear: make visual contact, take a short moment to aim, then immediately focus the thrusters. That turns a dangerous alarm unit back into exactly what it should be: a quickly removable target with a clearly defined weak point.
Hornet Weak Points
The Hornet weak points are located at the unarmored rear thrusters. This is especially important with this enemy because, unlike the Wasp, the Hornet has light frontal armor and is therefore much more unpleasant to fight from the front. If you simply fire at the Hornet from the front, you are often attacking its stronger side. The documented weak point is explicitly located at the unarmored rear thrusters. That is where the extra protection is missing, and that is exactly where the Hornet can be destabilized most effectively. Anyone who uses the Hornet weak point properly shortens the fight significantly and at the same time reduces the danger of its attack.
The Hornet is not only annoying because of its flight movement, but also because of its attack, which according to the current enemy tips should be answered with a dodge roll as soon as it gives its attack signal. That is exactly what creates the best tactic against it: do not act blindly from the front, but use movement, dodge the attack, and then hit the rear thrusters. The Hornet weak points are therefore closely tied to the enemy’s combat rhythm. If you move well, you get better angles on its rear. If you stand still and trade from the front, you make things unnecessarily difficult for yourself.
This is especially crucial in fights with several flying ARC. Hornets often do not appear as isolated single enemies, but together with other air units. That is when the difference between good and bad play becomes obvious: anyone who knows the Hornet weak point waits for the right moment, dodges the attack, and punishes the exposed rear thrusters. Anyone who does not do that wastes too much time on the front side and risks unnecessary damage. Since the general armor hints in the game clearly distinguish between dark armor, white surfaces, and yellow weak points, the Hornet fits perfectly into this logic: tougher in front, exposed in the rear, vulnerable there. The best method therefore remains clear: read the attack, dodge, focus the rear thrusters, finish the Hornet quickly.
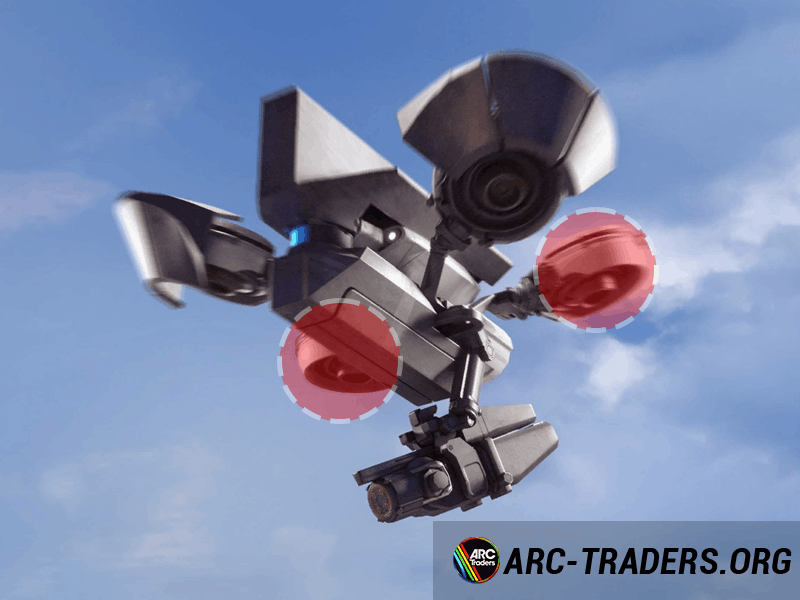
Wasp Weak Points
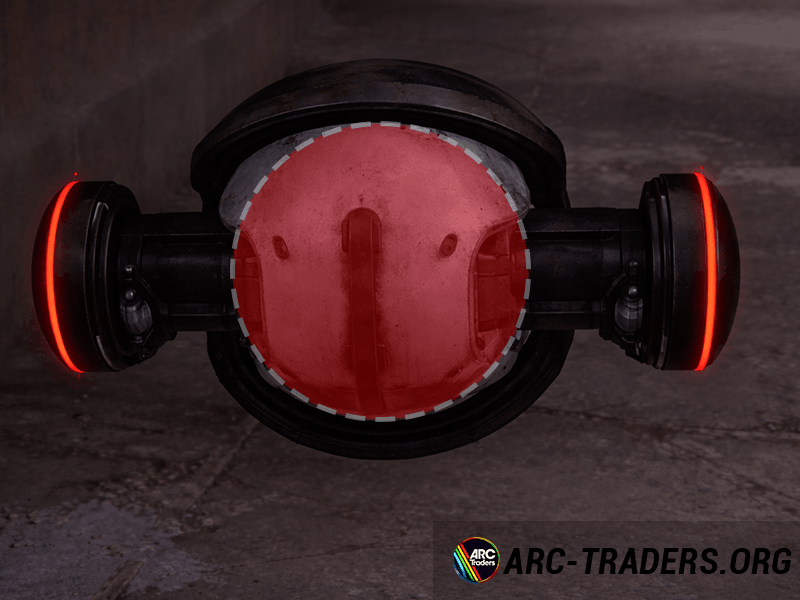
The Wasp weak points are located at its thrusters. These thrusters are the central point of attack because, according to the current enemy tips, the Wasp is easily destabilized as soon as its thrusters are damaged or destroyed. This is especially important because the Wasp may be small, but its mobility and tendency to appear in groups can quickly make it very annoying. Anyone who blindly shoots at the hull may still take it down with some luck, but is not making optimal use of its documented vulnerability. Anyone who prioritizes the thrusters, on the other hand, takes away exactly what makes it strong: mobility, positioning, and air control.
The Wasp weak point is especially relevant because this enemy rarely creates pressure alone. Single Wasps are usually still manageable, but several at once can bring shields down quickly and make fights messy. The best answer to that is not uncontrolled spraying, but precise shooting at the propulsion units. The thrusters are the point where you turn an annoying aerial target into one that drops quickly. That is exactly why the Wasp is one of those ARC enemies where good target selection matters more than pure sustained fire. Its body is not heavily armored overall, but its documented weakness still clearly lies in the thrusters.
In combat, it is worth taking advantage of short firing windows. As soon as the Wasp hovers steadily in the air for a moment or its flight path becomes readable, the thrusters are the best target. The game’s general armor logic supports exactly that: weak points have priority, unarmored areas are easier to crack, and hard dark plates absorb more damage. The Wasp weak points fit perfectly into this system. So instead of wasting time on random body shots, you should cleanly aim for the thrusters. That saves ammunition, speeds up the kill, and prevents a small drone group from turning into a constant nuisance. Anyone who consistently uses the Wasp weak point makes every fight against this enemy class much easier.
Tick Weak Points
For the Tick weak points, there is currently no separately named special point like thrusters, core, or canister. Instead, the documented weakness of the Tick lies in the fact that it can be easily destroyed with any weapon. That is exactly what matters when dealing with this enemy. The Tick is not dangerous because it can take a lot of punishment, but because it is small, fast, and easy to overlook. In addition, it is often heard before it is seen, and once it latches on, you are supposed to dodge roll immediately. The Tick weak point is therefore not a single glowing hit zone, but rather its very low durability combined with its melee-oriented nature.
That sounds simple at first, but it is extremely important in combat. Many players automatically look for a color-marked weak point on every ARC. With the Tick, that is not the core issue. Its weakness lies in the fact that it can be removed early and with little effort if you notice it in time. If you let the Tick get too close, you turn an already fragile enemy into a problem. If you react immediately, briefly target it, and eliminate it right away, you make optimal use of the Tick weak point. In practice, that is almost always the right decision, especially in hectic fights with several ARC types at once.
For a good fight against Ticks, attentiveness is therefore what matters most. Audible movement, frantic close-range approach, and the moment it jumps at you are the key indicators. The Tick has no documented heavy armor and no explicitly described special critical point, but it does have very little resistance. That makes the Tick weak points easy to summarize: react immediately, any weapon works, do not hesitate, and roll immediately on contact. Especially in tight areas or with poor visibility, an ignored Tick can become annoying even though it is actually one of the most fragile ARC in the game. Anyone who consistently exploits its low durability removes all danger from it and turns an annoying pest back into exactly what the available data says it is: a quickly removable target without a complicated mechanic.
Pop Weak Points
The Pop weak points currently do not consist of a single clearly named component, but rather of its low durability and its very predictable melee function. The Pop is described as an enemy that can be easily destroyed with any weapon. In addition, it is recommended to climb upward during an ambush and, at the right moment, dodge roll over it to trigger its explosion. That shows very clearly what the actual Pop weak point is: it is strongly tied to its approach and its explosion mechanic. If you take away that distance and that sequence, you almost completely defuse the enemy.

Unlike larger ARC, you do not first need to look for a special canister, core, or scanner on the Pop. What matters is that you shoot it early or outplay its approach with positioning and movement. Its documented vulnerability lies precisely in the fact that it goes down very quickly and becomes much less dangerous in vertical situations. The Pop weak points are therefore closely tied to space control. If you can use a ledge, an edge, or an elevated position, the Pop loses a large part of its threat. If you stay flat on the ground and react too late, it forces you into its own explosion game.
In combat, the best approach is therefore simple and effective: destroy it early, do not let it get close unnecessarily, use elevation, and do not take its explosion head-on. That is what makes the Pop weak point practically useful. It would be wrong to claim some artificial yellow special point here when the current enemy overview instead clearly points to easy destructibility and movement as the counter. Anyone who handles Pops calmly and quickly not only saves ammunition, but also avoids unnecessary chip damage in hectic fights. This knowledge is worth gold especially in tight indoor areas or when facing several small ARC at once. So the Pop weak points mainly consist of the fact that the enemy goes down easily, performs poorly in vertical spaces, and can have its own explosion used against it if timing and movement are right.
Fireball Weak Points
The Fireball weak points are located at its white core, which becomes visible when the Fireball opens up to attack. That exact moment is the central timing window of the entire fight. The Fireball is not just a rolling enemy, but an armored ARC whose vulnerable core is not constantly exposed. As long as it stays closed, it is much more difficult to deal with. But as soon as it attacks and opens its armor, the documented Fireball weak point is exposed. Then precise damage to the white core is the fastest and cleanest solution. It is also stated that a Heavy Ammo round is very effective as well.
That is exactly why you should not nervously fire at every visible metal surface on the Fireball. The fight works better if you read its behavior and wait for the exact opening moment. This enemy rewards timing more than blind sustained fire. The Fireball weak point is tied to a clear attack window: open up, core visible, hit it, then immediately start moving again. This is also important because after shooting it down, you are supposed to keep your distance or dodge roll to avoid the fire. So even a cleanly defeated Fireball can still be dangerous if you remain too close.
In practice, that means: hold position first, then wait for it to open, hit the white core, and immediately move out of the danger zone. Vertical movement also helps if you get ambushed, because climbing is explicitly named as a good reaction to an ambush. The Fireball weak points are therefore clearly defined: not the closed shell, but the white core exposed during its attack. Anyone who knows this pattern turns a hectic fire enemy into a very predictable fight. That not only saves resources, but also prevents unnecessary mistakes caused by panicked shots at the wrong areas. For consistent kills against Fireballs, less sustained fire and more control is therefore the right approach.
Turret Weak Points
For the Turret weak points, there is currently no explicitly named single special weak point like a core, thruster, or canister. Instead, the documented weakness of the Turret lies in its static position, its predictable attack pattern, and its vulnerability to Heavy Ammo, which is usually enough in just a few hits. That is exactly the key against this enemy. A Turret can seem dangerous because it controls lines of cover, but in return it does not have the mobility of other ARC. Anyone who provokes its shot, takes cover, and correctly reads the firing window uses the Turret weak point exactly as this enemy is meant to be fought most efficiently.
In direct combat, you should not permanently challenge the Turret from the front. The better method is to bait its attack, disappear briefly, and then punish it with high-penetration ammunition. This documented tactic also shows how its weakness works: it depends on you staying exposed and walking into its line of fire. If you take away that advantage, all that remains is a stationary target that cannot reposition itself. That is exactly why the Turret weak point is not a glowing individual spot, but is still very clear. Its weakness lies in its rhythm, not in a special body part.
This is also helpful in practice because many players expect a visibly marked critical point on every ARC. With the Turret, however, the most important approach is calmness, timing, and Heavy Ammo. Anyone who times their peeks cleanly takes control of the area away from it very quickly. In addition, the game’s general armor logic applies here again: stronger penetration is valuable against tougher targets. The Turret weak points are therefore best summarized like this: static position, predictable attack, heavy ammunition as an efficient counter. In real firefights, that means you do not seek an open trade, but instead get the Turret to shoot first and then drop it during its vulnerability window. That is the most reliable and cleanest way to handle this enemy class.
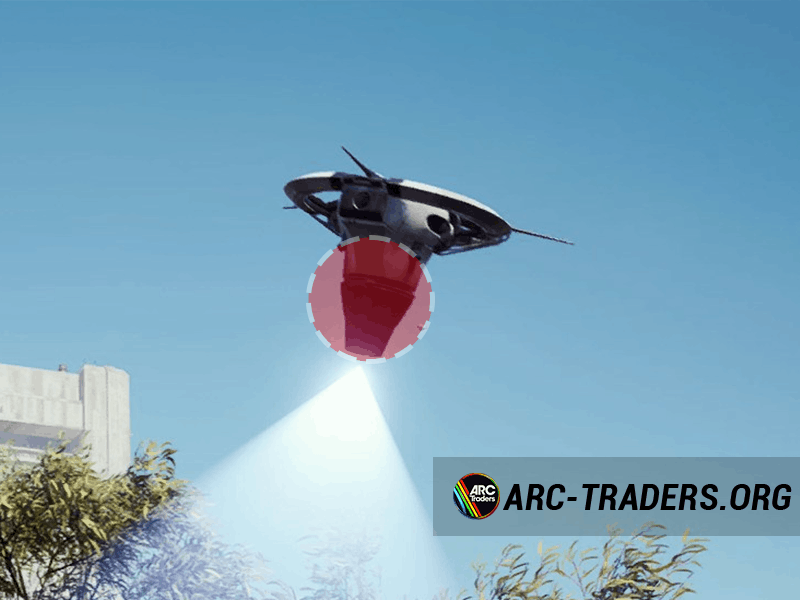
Sentinel Weak Points
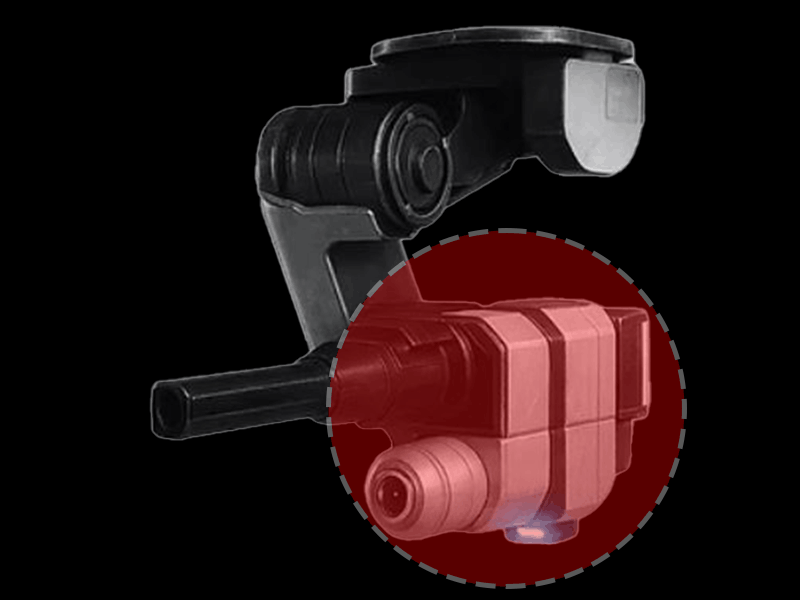
The Sentinel weak points are located at the yellow canister on its arm. That exact container is the clearly named weak point and therefore the most important target in a fight against a Sentinel. The enemy is described as a long-range sniper turret and uses clear visual signals: a red beam when it is aggressive, and four yellow beams shortly before it fires. These indicators are important because the Sentinel can become extremely dangerous at range. Its Sentinel weak point is therefore not just a bonus target, but the decisive attack point for quickly neutralizing one of the most unpleasant long-range enemies.
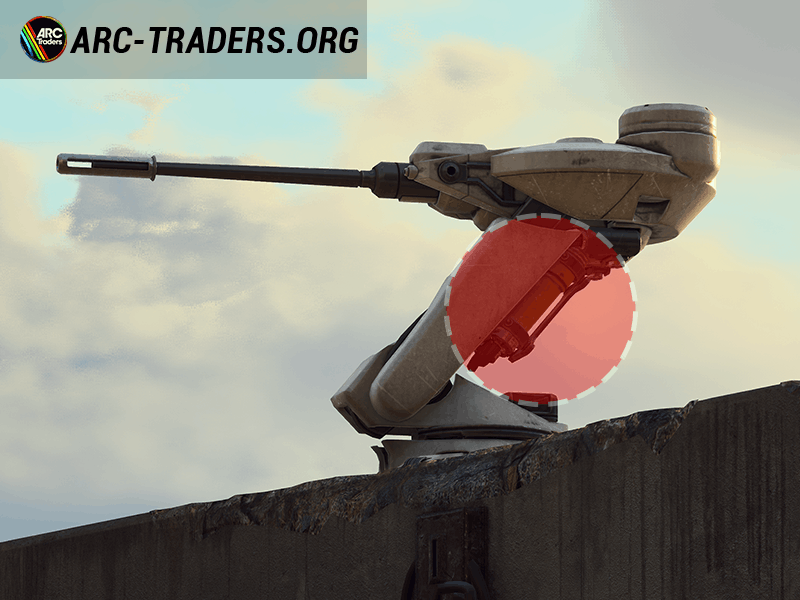
The clean sequence against the Sentinel is clear: first provoke its shot, then use cover, and after that deliberately hit the yellow canister on its arm. This order is important because you want to avoid unnecessary exposure phases against a sniper ARC. The Sentinel weak point can be exploited best when you are not standing under pressure in its line of sight. Anyone who instead recognizes its warning signals, times the shot, and then peeks cleanly will hit the decisive point much more reliably. That makes the fight controllable and prevents the Sentinel from dominating the entire area with its range.
Especially on open maps or in long sightlines, a Sentinel should be prioritized early. An ignored Sentinel can permanently disrupt fights, while a well-placed hit on its weak point solves the problem quickly. The game’s general weak-point logic supports this as well: yellow areas have priority and deal direct damage. That is exactly why the arm canister is so valuable here. The Sentinel weak points are therefore clearly defined: read its attack, use cover, focus the yellow arm canister. Anyone who does that consistently minimizes risk and maximizes efficiency. In practice, that is often the difference between a difficult long-range fight and a quick, clean takedown.
Surveyor Weak Points
The Surveyor weak points are located at its core, which becomes visible when the Surveyor uses its laser. The Surveyor is unusual because it is heavily armored, but is not defined by classic aggressive weaponry. Its real challenge is that its vulnerable core is not permanently exposed and that the enemy can flee at high speed when threatened. That is exactly why the Surveyor weak point is a typical timing-window target. As soon as the Surveyor uses its laser, its core becomes exposed. That is the right moment to deal damage to the area that is actually vulnerable.
Anyone who wants to fight the Surveyor should not simply keep firing at the closed shell and hope that it eventually drops. It is more effective to read its sequence and act exactly when the core is exposed. In addition, explosives are recommended, and stuns like Hornet Driver or Showstopper are also explicitly named as useful tools. That fits the enemy’s behavior perfectly. The Surveyor weak point is clearly defined, but only briefly visible. Anything that limits its movement or makes the moment easier to exploit significantly increases the chance of a quick kill.
In practice, you should therefore play patiently, but decisively. Watch it, wait for the opening moment, then hit the core deliberately. If the Surveyor flees under pressure, the fight quickly becomes inefficient. That is exactly why it is worth preparing the situation and not starting the encounter uncontrollably in open areas. The Surveyor weak points are best exploited when distance, sightlines, and possibly stun options are on your side. That makes the fight much cleaner and saves resources. Instead of laboriously working through the shell, you go straight for what really matters: the core exposed during the laser use. Anyone who knows this mechanic takes away the Surveyor’s greatest advantage and turns a tough target into a predictable ARC with a clearly defined vulnerability phase.
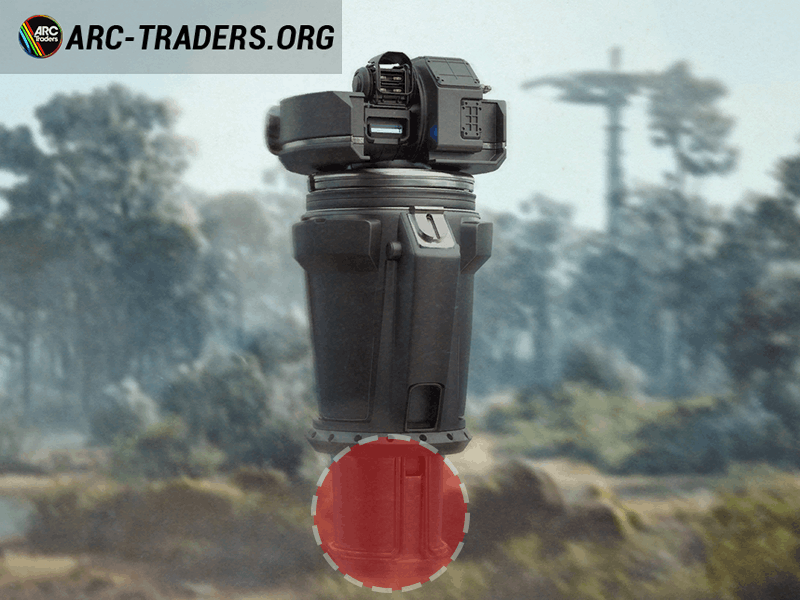
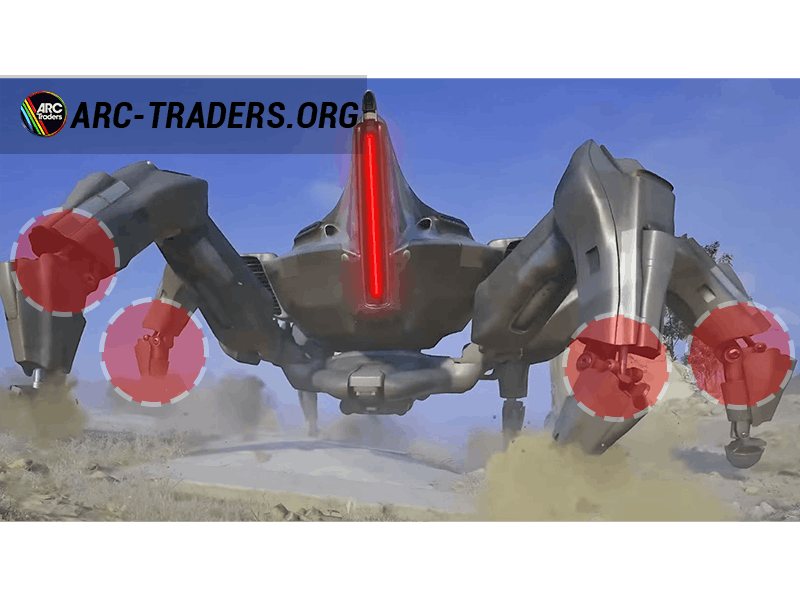
Shredder Weak Points
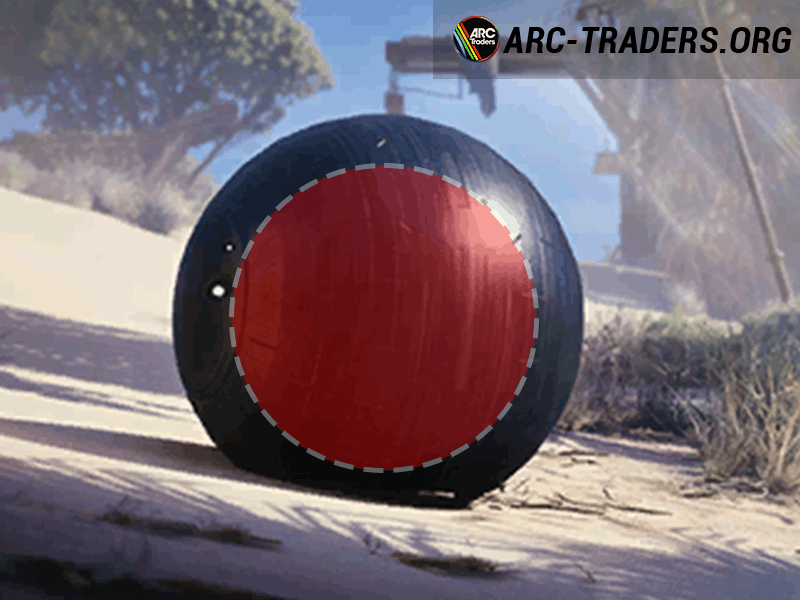
The Shredder weak points are located at its thrusters. That is the clearly named main weakness of this enemy and at the same time the most important way to reduce its danger. The Shredder is explicitly described as an enemy that should never be attacked without sufficient cover. In addition, you are supposed to take cover as soon as it signals its attack. That alone already shows that an open sustained-fire fight is not sensible here. The Shredder weak point is therefore not just some random hit bonus, but the most direct way to bring a dangerous ARC under control. If its propulsion is damaged, it loses stability and with it combat power.
Everything that creates quick pressure works especially well against the Shredder. Heavy Ammo and grenades are explicitly recommended, as is the Hullcracker. That fits perfectly with its weak-spot structure. Thrusters are almost always a worthwhile target on flying or hovering ARC, but especially so on the Shredder. Knowing the Shredder weak points means not fighting the encounter through total body damage, but through deliberate hits to the thrusters. In that way, you not only exploit the documented vulnerability, but also shorten the dangerous time windows in which the enemy can attack freely.
In practice, you should always fight the Shredder with structure: first use cover, then respect its attack signal, and afterward work its thrusters with heavy hits. Anyone who remains exposed loses far too much against this enemy. Anyone who instead uses its weak point properly quickly takes away its advantage. Because the Shredder only appears on Stella Montis, it can surprise players who do not know its behavior. Then people often spend too long shooting at the body even though the actual solution lies in the thrusters. The Shredder weak points are therefore clearly defined: prioritize the thrusters, use cover consistently, and prefer a few strong hits over wasting ammunition uncontrollably. That keeps the fight manageable even if the enemy looks much more threatening at first glance.
Comet Weak Points
For the Comet weak points, there is currently no officially named single special point like a core, thruster, or canister. Instead, the documented vulnerability of the Comet results from its explosive fighting style, its susceptibility to Heavy Ammo or grenades, and the clear recommendation to dodge sideways before it explodes. From that, the actual Comet weak point can be derived: it is most vulnerable when you pressure it quickly with strong damage and do not play its approach head-on. Its danger lies in the moment of explosion, and its weakness lies in your movement and in hard burst damage.
That makes the Comet an enemy that should not be handled in an unnecessarily complicated way. Instead of searching for an uncertain glowing individual point, it is more sensible to play the documented counter consistently. If the Comet is near you, dodging sideways is mandatory. If you have time for the counterattack, heavy hits or explosives are especially effective. The Comet weak points therefore lie less in a special visible component and more in the fact that its attack pattern is predictable and its explosion game can be exploited. Anyone who controls it and does not panic-tank it from the front neutralizes it very reliably.
Climbing is also named as a good reaction to an ambush. That also fits the structure of this enemy, because vertical positions make its dangerous approach more difficult. In practice, that means: do not wait until the last moment, pressure Comets early, and in close range always look for sideways movement. The Comet weak point is therefore best described like this: strong against unprepared players, but vulnerable to positioning, dodge timing, and powerful bursts of damage. Anyone who combines those three things properly turns a hectic explosive enemy into a surprisingly predictable fight. Especially in combination with other small ARC, it is worth not ignoring the Comet, but exploiting its documented weaknesses immediately before it can even develop its full value.
Firefly Weak Points
The Firefly weak points are located at two clearly named spots: the semi-armored thrusters and the yellow canister on its body. This exact double weak-point structure makes the Firefly an enemy where good target selection is especially rewarding. On the one hand, it can be easily destabilized by destroying its thrusters; on the other hand, the yellow body canister provides another clear attack point. This makes the Firefly weak point flexible to use: depending on the angle from which you are facing the enemy, you can either focus the thrusters or the yellow canister.
In direct combat, that is a big advantage. If the Firefly rotates in a way that makes the thrusters clearly visible, it is worth placing deliberate shots there because you take away its stability and freedom of movement. If it is showing you more of its side or front body, the yellow canister is often the better target. The Firefly weak points are therefore not only clearly defined, but also tactically very strong, because you are not dependent on a single narrow critical point. Instead of firing broadly at the chassis, you deliberately look for the documented vulnerabilities and work through them one after another or situationally.
This pays off especially in hectic firefights. Otherwise, the Firefly can survive unnecessarily long because of its mobility if you simply keep aiming at the middle. Anyone who knows the Firefly weak point shortens the fight significantly. The semi-armored thrusters reward precise fire, while the yellow canister offers a clearly readable target that promises direct damage. Since yellow weak points should generally be prioritized in the game, the body canister is especially valuable here, while the thrusters additionally break mobility. That exact combination makes the Firefly an enemy that becomes much easier with knowledge. The Firefly weak points are not hidden, you just have to deliberately play them. Then a nimble aerial target turns into an enemy that falls apart surprisingly quickly.
Spotter Weak Points
For the Spotter weak points, there is currently no explicitly named single classic weak point like a core, thruster, or rear canister. Instead, the documented weakness of the Spotter lies in its function: it must be destroyed quickly before it gets a target lock. In addition, it is stated that seeker grenades are especially efficient against it and that you should look for vertical cover to avoid Bombardier attacks. This shows very clearly what the Spotter weak point consists of: not an isolated component, but rather its low tolerance for fast focus and its role as a support unit.
The Spotter is so important because it makes other ARC fights more dangerous, especially in combination with a Bombardier. If you remove the Spotter early, you reduce the larger enemy’s information and target acquisition. That is exactly what makes its weakness practically useful. The Spotter weak points therefore lie mainly in prioritization and speed. You do not want to ignore it while you work on the big ARC first; you want to take it out immediately before it fulfills its role. In that regard, the Spotter is almost the opposite of a tank-type enemy: it does not survive long if you prioritize it correctly, but it becomes very annoying if you let it live too long.
In practice, that means: focus Spotters as early as possible, keep seeker grenades in mind as a particularly efficient option, and meanwhile use vertical cover against indirect pressure. The Spotter weak point is not described as a single yellow point, but as a tactical vulnerability: get it off the field quickly before it provides value. That is extremely helpful especially in combined fights. Anyone who ignores Spotters often makes the following Bombardier fight unnecessarily difficult. Anyone who consistently uses the Spotter weak points, on the other hand, simplifies entire encounter structures. That makes it an enemy whose danger is strongly tied to time and whose most effective weakness is therefore early elimination instead of a long exchange. This knowledge often saves more resources in the game than any additional damage stat.
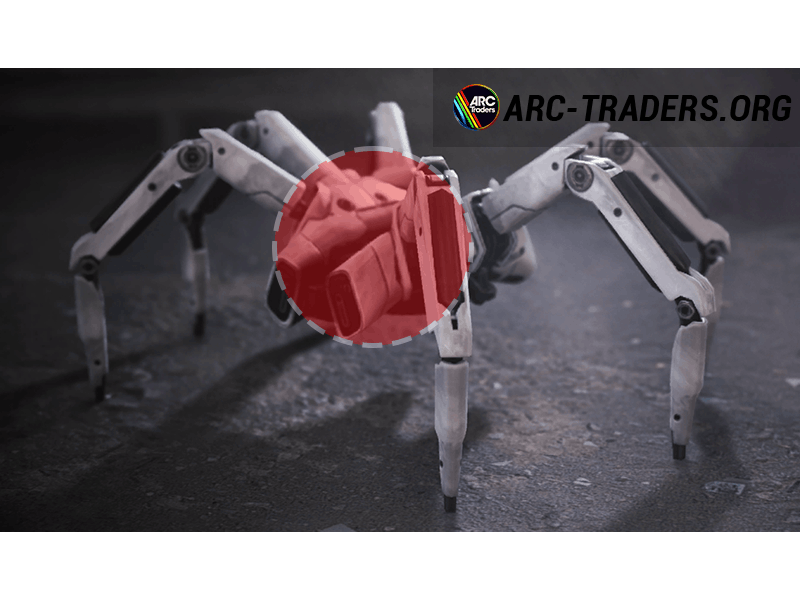
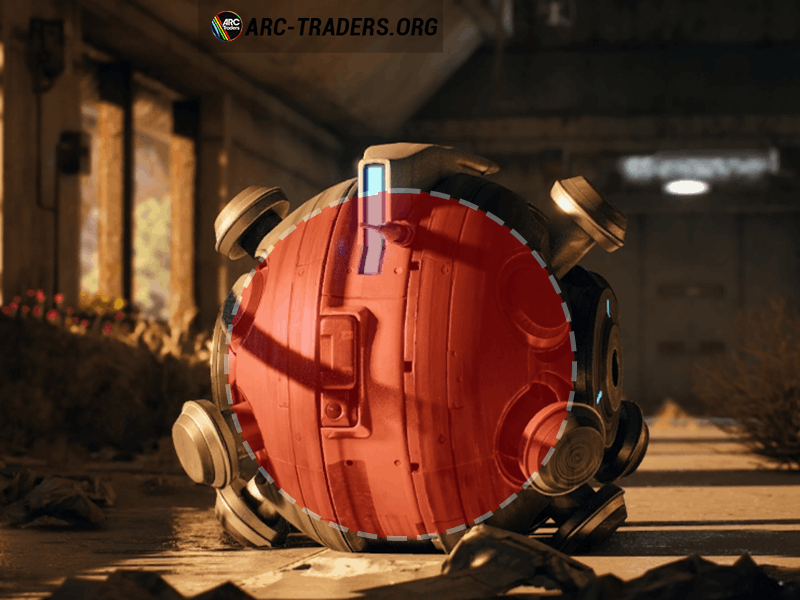
Bombardier Weak Points
The Bombardier weak points are clearly defined: its yellow leg joints and the rear canister. These two areas are exactly the most important target points in a fight against a Bombardier. In addition, it is stated that Heavy Ammo and the Hullcracker are especially effective. That fits perfectly with its design as a large, dangerous ARC that does not go down efficiently through random area damage, but through deliberate hits to the spots that are actually vulnerable. Anyone who knows the Bombardier weak point therefore does not simply attack the body at random, but works first on the yellow joints and the rear canister.

The combat structure against the Bombardier is also clearly described. Its close-range shockwave should be avoided, Spotters should be destroyed to reduce its vision, and you should find cover both above you and in front of you while shooting at the leg joints. From that, the ideal practical approach becomes clear: do not stand exposed in front of it, but use good cover lines to break the legs and then punish the rear canister. The Bombardier weak points are therefore not just hit zones, but part of an entire tactical sequence. Anyone who only trades damage loses. Anyone who plays through cover, positioning, and weak-point focus wins much more cleanly.
It is also important that Bombardiers are often accompanied by Hornets and Wasps. That means the fight quickly becomes chaotic if you only focus on the enemy’s mass and lose sight of its vulnerable points. Even so, the Bombardier weak point remains clear: yellow leg joints and rear canister. Support tools like Deadline or Wolfpack grenades can also help, but the core of the fight remains the precise targeting of these zones. Anyone who approaches the Bombardier in a controlled way, reduces its vision and escort support first, and then systematically works on its documented weak points, takes away the greatest threat from one of the most dangerous ARC in the game. That turns a seemingly overwhelming enemy into a structured fight with clear goals and good damage windows.
Bastion Weak Points
The Bastion weak points are located at the yellow leg joints and the rear canister. These two points are exactly the most important hit zones against a Bastion. The enemy may be slow, but it can turn its weapon quickly. That means a frontal trade is unnecessarily risky even though the Bastion does not seem especially mobile. Anyone who uses the Bastion weak point correctly therefore does not fire blindly at the massive body, but deliberately at the joints and the canister. That is where you get the greatest effect out of your damage and play against its documented vulnerability instead of its robust front.
It is also described that the Bastion is helpless when hit with stuns like Hornet Driver or Showstopper. That is also extremely valuable in combat because it gives you time and stable angles on its weak points. The recommended approach of pulling it into a corner and then shooting at the leg joints shows very clearly how this enemy is meant to be fought most efficiently. The Bastion weak points are therefore not just abstract hit points, but part of a concrete strategy: control space, reduce its movement options, then deliberately exploit the joints and the rear canister.
Escort enemies also play a role here, because Bastions often appear together with Hornets and Wasps. Anyone who only looks at the large target body quickly loses track of the situation. Even so, the central truth remains the same: the Bastion weak point lies at the yellow joints and the rear canister. Additional tools like Deadline on the rear or on the head as well as Wolfpack grenades can accelerate the kill, but the core of the fight remains precise focus on these vulnerable zones. Especially because the Bastion looks visually massive and threatening, it is all the more important not to be fooled by its appearance. It can take a lot of punishment, but not equally everywhere. Anyone who plays its documented weak points properly takes control of the fight away from it piece by piece and eliminates it much more efficiently than through pure body damage.
Leaper Weak Points
The Leaper weak points are located at the leg joints and the eye. These two points are the clearly named weak spots of this enemy and therefore the most important targets in combat. The Leaper is one of the larger, more dangerous ARC variants and can therefore take much more punishment than small drones or melee ARC. That is exactly why precise aiming is especially valuable here. Anyone who simply shoots at the enemy’s mass makes the fight unnecessarily long. Anyone who knows the Leaper weak point focuses the joints and the eyeball, meaning exactly the spots where the enemy can be damaged most effectively.
It is also stated that explosives deal with the Leaper very quickly and that it becomes practically helpless when stunned with tools like Hornet Driver or Showstopper. That is enormously helpful in practice because the eye is not always easy to target freely when the enemy is under pressure or moving. The Leaper weak points can be exploited much more effectively if you briefly control it or apply explosive pressure. That opens safe windows onto the joints and the eye without forcing you into a risky trade fight.
It is also important that Leapers often patrol together with Hornets and Wasps. That quickly creates messy fights in which people lose sight of the actual priorities. This is exactly where knowledge pays off. The Leaper weak point is clear: joints and eye, not random damage on the overall body. This works best with a prepared setup, clean space control, and enough burst to truly exploit its vulnerability windows. Anyone who tries to brute-force the Leaper with raw DPS often burns more resources than necessary. Anyone who instead deliberately plays its documented weak points reaches the goal faster and at the same time minimizes the pressure this ARC can build up in longer fights. Especially against large targets, clean target selection decides the fight, and with the Leaper that target selection is unusually clear.
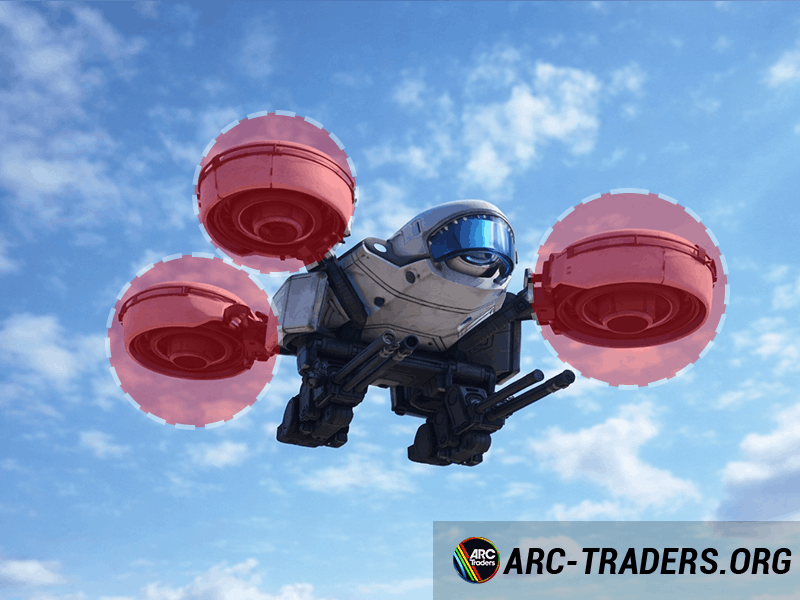
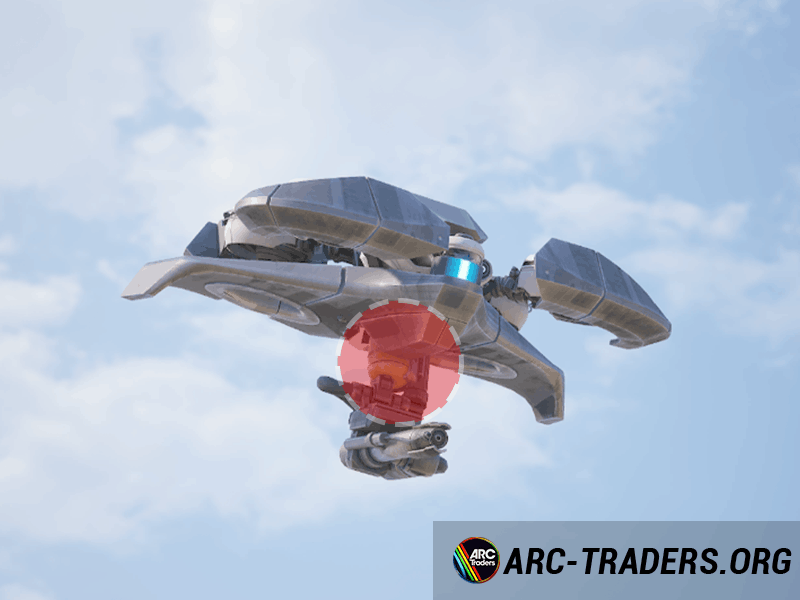
Rocketeer Weak Points
The Rocketeer weak points are located at the thrusters and above the scanner. In addition, a silver canister on its back is named as an important target area. This makes the Rocketeer one of the ARC enemies with several clearly recognizable vulnerable zones. The thrusters are especially important because the enemy can be destabilized by Hornet Drivers or destroyed thrusters. That is exactly what makes the Rocketeer weak point so valuable: you are not only attacking its health, but directly its stability and movement function. At the same time, the area above the scanner provides another clear attack point for precise hits.
In direct combat, you should therefore not simply see the Rocketeer as a large flying enemy with a lot of health. It is much more effective to deliberately play between its documented weak points. If it shows you the thrusters, those are often the best choice because they throw it off balance. If you get good front or upper angles, the area above the scanner is especially valuable. The silver canister on its back further complements this weak-point profile and rewards good positioning. The Rocketeer weak points are therefore not only numerous, but also highly tactical: the angle determines which target makes the most sense at that moment.
Support tools also play a role. Two Wolfpack grenades are described as effective, and the ability to destabilize it through stuns or destroyed thrusters makes the entire fight much more controllable. Anyone who instead works on the Rocketeer only with unfocused body damage leaves a lot of potential unused. The Rocketeer weak point is especially strong because you can attack the enemy on several levels: break its mobility, land critical hits above the scanner, and exploit its rear container when the angle is right. That turns a dangerous rocket ARC into an enemy with clear points of attack. Anyone who recognizes and prioritizes these zones saves time, ammunition, and nerves, and takes away exactly the qualities that otherwise make the Rocketeer so unpleasant.
Queen Weak Points
The Queen weak points are located at the yellow weak points on the legs and at the red glowing core, which becomes visible after shooting off the armor plates. That exact order is decisive. The Queen is not an enemy where you can go straight for the core from the very first moment. First, the armor parts have to be removed, and only then does the red core become the actual main target. That makes the Queen weak point a multi-stage mechanic: first break the armor, then focus the core, while the yellow leg weak points remain important attack points as well.

This structure is especially important with boss-like ARC. Many players waste time by shooting at still-protected areas or by failing to clearly distinguish between removing armor and dealing core damage. With the Queen, the best solution is documented: shoot away the armor and then focus the red glowing core. At the same time, the yellow weak points on the legs remain relevant targets, especially if the core is not yet exposed or if the current angle does not allow you to safely work on it. The Queen weak points are therefore not only clear, but also logically structured. You fight your way from the outside inward through the enemy’s defenses.
In addition, special tools like Deadline on the head or on the exposed core are mentioned, which can accelerate the kill further. Even so, the most important principle remains the same: do not blindly shoot at the massive body, but understand the Queen’s combat phases. Its weak point is not equally visible at all times, but develops over the course of the fight. That makes it dangerous, but also predictable. Anyone who removes the armor in a structured way, watches the yellow leg points, and immediately prioritizes the red core as soon as it is exposed makes optimal use of the documented weak points. That exact knowledge is the difference between wasted resources and a controlled boss fight when facing large ARC. The Queen looks intimidating, but its vulnerability is clearly recognizable if you read the phases of the fight properly and play them out consistently.
Matriarch Weak Points
The Matriarch weak points work according to the same clear principle as the Queen: first the armor plates have to be shot off, then the red glowing core becomes the decisive main target. In addition, the Matriarch has yellow weak points on the legs that are always important attack points. This exact combination is what defines the Matriarch weak point. It is not enough to simply fire at the largest visible area. Anyone who wants to defeat the Matriarch efficiently has to open up its defenses layer by layer and then consistently switch to the core as soon as it is exposed.
This is enormously important in combat because the Matriarch, as a large ARC, appears extremely threatening and easily tempts players into spreading damage without focus. That is exactly the wrong approach here. The documented sequence is clear: armor plates off, then the red glowing core. The yellow leg weak points also provide reliable targets if the core is not yet exposed or if the current angle does not allow clean core damage. The Matriarch weak points are therefore multi-stage and should be thought of in exactly that order. Anyone who ignores that only extends the fight unnecessarily and gives the Matriarch more time to build pressure.
Tools like the Deadline mine on the head or on the exposed core can accelerate the fight further, but they do not change the basic principle. The Matriarch weak point becomes clearly readable as soon as you understand that its armor is not the actual target, but only the first hurdle. In practice, you should therefore play calmly and systematically: look for safe angles, remove the armor deliberately, use the leg weak points, and immediately prioritize the red core as soon as it becomes visible. That is exactly what turns a huge ARC enemy into a controllable multi-phase fight. Anyone who consistently exploits the documented weak points of the Matriarch not only saves resources, but also keeps an overview even in longer fights. That is the key against large ARC: do not be impressed, read the fight structure, and deliberately exploit the real vulnerabilities.